Gun Casting

How to make a 17th Century bronze or iron gun
Gun casting at Horsmonden Furnace would have involved creating a model of the gun to be built and creating a mould from the model. A central mould of the bore would be dropped in prior to casting which would be done in a pit close to the furnace.
Making the gun model
Initially a model of the gun would be created out of wood built up with clay. The clay was built up round a wooden spindle which was greased and wound with rope. The model was then suspended between trestles, turned continually while a mixture of loam and horsehair was added to the rope surface to build up the gun model. Once at the right size, it was shaped with a strickle board (a foundry tool) to gain the right shape. The strickle board was held against the gun model, shaving off the clay as the model was being turned.
The model was extended by about two feet to create a dead head where the excess metal could gather. The breach was added at a later time.
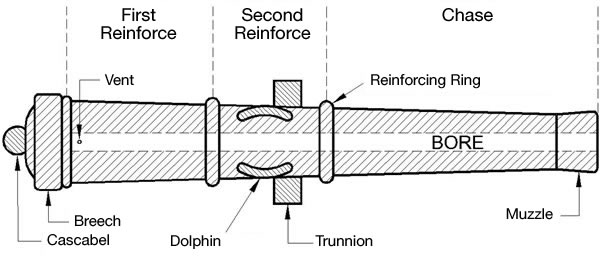
Once the model was finished it was dried by heating and a thin layer of wax was applied to the surface to help its later removal from the mould. Wooden models of the trunnions were then attached to the main model and placed slightly nearer to the muzzle than the breach which made controlling of the gun elevation easier.
Adding decorations
Finally wax models of the decoration and dolphins were attached. In most cases this was done by fixing a small mould to the model’s surface and casting the item onto it. The mould were then removed, leaving a wax model of the suface design.
Making the gun mould
The whole model was then coated with more clay of a different type and diluted with water. Four or so coats of this clay were applied and then dried, and then larger quantities were applied to a thickness that depended on the type of gun. The larger the gun, the thicker the mould in order to hold the weight of the bronze or iron, which could weigh up to two tons. Iron hoops were added to reinforce the clay.
Removing the gun model
Once the mould was bound, the model, ot positive image of the gun barrel had to be removed. This was done by a mallet with the spindle being removed as well as the trunnion patterns. Without the spindle, the rest of the clay had no central support and would collapse leaving a negative replica of the gun. The mould was checked for any stubborn pieces of clay remaining until the mould was near perfect. The breach mould was attached to the end of the gun.
Forming the gun bore
In the 17th Century all guns were made using a central core. This was an iron spindle covered in clay and horsehair. The core was eventually to form the bore. The final layer of clay was applied and a strickle board used to replicate the calibre of the bore of the gun. Chaplets, iron rings with four radiating arms were used to secure the core at the top and bottom of the mould in the central position of the bore. It was critical to the use of the gun that the bore was parallel to the axis of the gun.
Sometimes chaplets were fixed into the breach mould but many were fixed into the bottom of the main mould. At the muzzle end a similar device held the core. It is still possible to see the existence of chaplets on some 17th Century guns, look at the breech end for corroded iron slots. The chaplets were sacrificial being cast into the bronze body of the gun.
Casting the gun
During casting the moulds were placed upright in a pit and earth build up around them. Channels were created to let the molten metal from the furnace flow into the heads of the moulds.
